Rosemary Olive Oil Chocolate Chunk Cake


Yes, I know, this sounds weird. But it is awesome. I assure you (as do my fellow members of CIA, who greedily devoured it at last week’s meeting) that it is absurdly delicious. It’s a perfect blend of sweet and savory, mixing rosemary, salt, and chocolate into a most wonderful cake/bread/dessert thing.

If you do make this, I recommend using a salt with larger crystals, such as sea salt or kosher salt. While table salt is perfectly fine, the fewer and larger crystals create little surprise explosions of delightful saltiness every few bites. It really gives the cake that extra something that makes it fun to eat. (I promise I wouldn’t use the phrase “little surprise explosions of delightful saltiness” unless I really meant it :P )

Also, be sure to use FRESH rosemary that comes on the little sprigs. One and a half tablespoons equals roughly three 3-4″ sprigs very finely chopped. If you’re really in a bind, you could try dried ground rosemary, but I can’t imagine it making a very tasty cake.


Picture by Jane at ButteredUp.com because I could never take a picture that does as much justice to this cake.

Rosemary Olive Oil Chocolate Chunk Cake
Recipe by Heidi at 101cookbooks.com, who adapted it from Good to the Grain by Kim Boyce.
(An alternate recipe can be found by clicking on the picture above.)

Prep time: 15 minutes
Cook time: 40-50 minutes

Dry Ingredients:
3/4 cup spelt flour
1.5 cups all-purpose flour
3/4 cups sugar
1.5 tsp baking powder
3/4 tsp kosher salt (or sea salt)

Wet Ingredients:
1 cup olive oil (plus a little bit extra to grease the pan)
3 eggs
3/4 cup whole milk (2% can be substituted)

1.5 Tbsp fresh rosemary, finely chopped
5 oz bittersweet chocolate (~70% cocoa), roughly chopped into 1/2″ chunks
2 Tbsp sugar for top crunch

Directions:
Preheat the oven to 350˚F. Rub a 9 1/2-inch cake pan with olive oil (alternately, loaf pans work well, too, as does most small- or medium-sized bakeware).

Mix the dry ingredients in a large bowl. Set aside.

In another large bowl, whisk the eggs thoroughly. Add the olive oil, milk, and rosemary, then whisk again.

Using a spatula, gently mix the wet ingredients into the dry ingredients. Stir in 2/3 of the chocolate. Pour the batter into the oiled pan, then sprinkle with the remaining chocolate and sugar.

Bake for about 40-50 minutes, or until the top is domed, golden brown, and a skewer or knife inserted into the center comes out clean.
Pumpkin Mug Cake!


Not only is this cake delicious, it’s also super easy and MICROWAVEABLE! Whether you enjoy it alone or share it with a friend, you are sure to love it :)

Recipe adapted from Kirbie and Bellalimento.

Microwave Pumpkin Mug Cake
Ingredients
Ingredients:
1 egg
2 tablespoons milk
1/4 cup pumpkin puree
7 tablespoons flour
1/4 tsp baking powder
1/4 cup sugar (white or brown – both are fine!)
1/2 teaspoon ground cinnamon
1/4 teaspoon salt

Place all ingredients into an oversized mug. Mix thoroughly with a fork.

Microwave on high for 2 minutes. Check doneness. Microwave for 30 or 60 second intervals until done.

*Depending on your microwave and the size of the mug you are using, cook time may vary from as little as two minutes to as much as 5 or 6 minutes. Very tall mugs may require a bit more time, whereas wide soup-style mugs cook a bit faster.

Top with whipped cream, ice cream, or nuts if desired (I recommend a bit of vanilla ice cream and maybe some walnuts!)

Falafel and Cucumber Sauce


Or, by its much less attractive name, Middle Eastern Chickpea Balls!
NOTE: I’m sorry I don’t have a picture – I was too distracted by how good they tasted to take any photos! But if you check the website where I found the recipe, you’ll find lots of falafel pictures associated with this recipe.

Recipe found here. I don’t know who Sean is, but he sure makes tasty falafel. I made these for the first C.I.A. meeting of the year, and they all disappeared in just a few minutes!

Traditionally, falafel is prepared by deep frying and then served wrapped in a pita with other delicious things. I do not own a deep fryer, nor do I intend to start deep frying my food any time soon. So I pan-fried it, unsure if skipping the frying process altogether would render an acceptable falafel. But then I found this helpful comment on the recipe page by HEAVENSNT86:

“So yummy and very easy to make! Instead of frying, I baked them in the oven. Preheat the oven at 400 degrees F. Spray the baking sheet and then the falafels with vegetable oil cooking spray. Bake 10 minutes, flip and spray again, then another 10 minutes. Then broil each side for 2 minutes. So good and much healthier! Thanks!”

So yes. Although I did not do so, falafel can be baked!

Sean’s Falafel and Cucumber Dip
*servings vary depending on how large you shape the balls to be.

Ingredients
1-15oz. can chickpeas (garbanzo beans), drained and rinsed
1 onion, chopped
1/2 cup parsley (fresh is better, but as a poor college student I just heaped in the dry stuff)
2 cloves garlic, chopped
1 egg
2 teaspoons ground cumin
1 teaspoon ground coriander
1 teaspoon salt
1 dash pepper
1 pinch cayenne pepper
1 teaspoon lemon juice
1 teaspoon baking powder
1 tablespoon olive oil
1 cup dry bread crumbs
oil for frying

In a large bowl mash chickpeas with a fork until thick and pasty. Avoid using a blender for this step, as the chickpeas should be on the chunky side to avoid a thin consistency. DO use a blender to process the onion, parsley and garlic, then stir the mixture into the mashed chickpeas.

In a smaller bowl, combine the egg, cumin, coriander, salt, pepper, cayenne, lemon juice and baking powder. Stir this into the chickpea mixture, along with olive oil. Slowly add bread crumbs until mixture is not sticky but holds together – you can add as many or as few breadcrumbs as you like. With the final mixture you can either shape them into balls or flatten them into patties.

Heat up to an inch of oil in a large skillet over medium-high heat. Fry the falafel in the hot oil until they are fully browned.

Cucumber Dip
Ingredients
1 (6 ounce) container plain yogurt
1/2 cucumber – peeled, seeded, and finely chopped
1 teaspoon dried dill weed
salt and pepper to taste
1 tablespoon mayonnaise

Combine ingredients in a small bowl. Chill for at least 30 minutes.

-Lauren

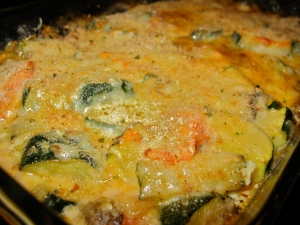
Zucchini Gratin


Zucchini Gratin

So this morning I was watching Down Home with the Neelys on Food Network and they made this dish – a delicious, creamy, and cheesy baked zucchini casserole. It looked delicious, and I made a mental note to make it someday soon. Then later this afternoon the question came up of what we were having for dinner, and with this recipe idea still in my mind I set out to prepare it. Being the lazy slob that I am, I didn’t feel like looking up the recipe, so I just decided to wing it from memory and adjust things as needed based on what we had in the fridge. It turned out beautifully, although it was slightly different from the casserole the Neely’s had prepared on television. This zucchini gratin makes for an excellent side dish, or can be served as a meal unto itself. If you crave a bit more, try adding some pasta, meat, or beans, or serve atop a large slice of your favorite artisan bread.

Zucchini Gratin
*makes about 4-5 servings

Ingredients
2 medium zucchini, skins on, cut into half-moons 1/2″ thick
1 large tomato, chopped into large chunks
2-8 oz packages baby portabella mushrooms, sliced thin
3 cloves garlic, diced
1/4 cup onion, diced
1/2 teaspoon dried thyme
2 tablespoons butter
2 tablespoons olive oil
1/4 cup milk
3-4 tablespoons flour
1/4 cup shredded mozzarella cheese
1/4 cup freshly grated Parmesan cheese
Salt and pepper to taste
2-3 tablespoons of breadcrumbs, if desired

1. In a large sautè pan, melt the butter over medium heat. Sautè the onion until translucent, then add the garlic, sautèeing for another minute or so.

2. Add zucchini, tomatoes, mushrooms, and olive oil, cooking for about 10 minutes (be sure to keep the pan covered as often as possible). During this time, add the thyme, flour, salt, and pepper.

3. Add mixture to a buttered 9 by 11-inch casserole dish (or one of similar capacity). Top with mozzarella and Parmesan cheese.

4. Bake at 350ºF for about 30 minutes.

5. If desired, remove from the oven and sprinkle with breadcrumbs, then bake for an additional 5 minutes.

–Lauren

Chocolate-drizzled Caramel Corn


Chocolate-drizzled Caramel Corn
I never liked caramel corn. Then one day I made this.

The original recipe can be found here, courtesy of Amy’s Food Room. What’s wonderful about this recipe is that it doesn’t use corn syrup (an ingredient that has always freaked me out just by the name alone) but instead sticks to simple things like butter and brown sugar to make something wonderful and every shade of delicious.

Here’s my version, which has some notes, minor tweaks, and one final chocolatey addition:
Note: the measurements need not be precise. I didn’t have enough brown sugar so I used only 3/4 lb and everything turned out fine.

Chocolate-drizzled Caramel Corn
*makes about 15 cups

Ingredients:
15 cups popcorn, unpopped kernels discarded
*about 5 bags prepared microwave popcorn
2 cups (1 lb) dark brown sugar
1 cup (2 sticks) butter
1/2 cup water
1 teaspoon salt
1 teaspoon vanilla (I mean good vanilla – none of this imitation garbage)
1/2 teaspoon baking soda

1. In a large saucepan, bring the brown sugar, butter, water, and salt to a boil. Continue boiling moderately for about 5-6 minutes until the mixture starts to thicken somewhat.

2. Remove the saucepan from the heat and stir in the vanilla and baking soda. The caramel will bubble upon addition of the vanilla, then puff up as you stir in the baking soda (the texture soon resembles that of beaten egg whites). Stir well. In a very large bowl (or in several smaller bowls), pour the slightly foamy caramel over the popcorn. Stir gently to ensure an even coating over all kernels.

3. Divide the caramel corn between two lined cookie sheets (you can line them with wax paper, aluminum foil, or nothing at all, which was what I did). Bake for 45 minutes at 250º, stirring every 15 minutes or so. Remove from the oven and let stand to cool a bit while preparing step 4 (the caramel will still be soft).

4. Using a double boiler, melt 1-12oz bag of chocolate chips. (If you’d like, more or less chocolate can be used. Also, I used chocolate chips simply because they’re cheap – if you’d like, you can simply melt down a bar or two of your favorite chocolate!)

5. Using a spoon or spatula, drizzle the chocolate over the caramel corn. Refrigerate for about 15 minutes or until the chocolate has hardened, then break the popcorn into pieces and enjoy!

–Lauren

Brainstorming Results from Tonight’s Meeting


  • Cooking classes – either taught by us or simply sponsored by us – 6th floor WPU has some facilities we might use
  • College dorm theme (no-bake or microwave)
  • Hand out college dorm-compatible recipes at activities fair and around campus
  • E-newsletter (receive a free booklet of college-themed recipes when you sign up for C.I.A. or for the e-newsletter!)
  • Food chemistry and mad food science
  • Elaborate-looking yet quick and easy meals
  • Food blog (here!)
  • Baked Sale. Next Year. 4/20. It will happen.
  • Snacks/meals to-go, free! (let’s try to get it funded) (means of advertising)
  • Advertising during activities fair and beyond: cookie/scone/treat wrapped, recipe included, on the back of the recipe is information about CIA! (“Edible business cards!” – Amanda W.)
  • C.I.A. Christmas party
  • Family House – Saturday morning breakfast (with a show!)
  • Brunch
  • Dinner and a show as an event on campus
  • Themed (holiday?) bake sales
  • Soup kitchens
  • Offer our services as caterers to campus events
  • Speaker – famous chef, maybe a vegetarian chef for Veg week?
  • Groups to potentially collaborate with – Student Dietetics Association, Free the Planet, Culinary Arts Club (does it still exist?).
  • Goals: Recruit new chefs. Grow. Expand. Establish connections and rapport.

-Lauren

Welcome!


Welcome to the home of the culinary division of Creative Integration of the Arts: Pittsburgh!

This is the start of what will soon become a blog of all things culinary in and around Pitt, including (but not limited to) events, pictures, and recipes, as well as any ideas brainstormed at weekly C.I.A. meetings.

Check back often and grow with us!